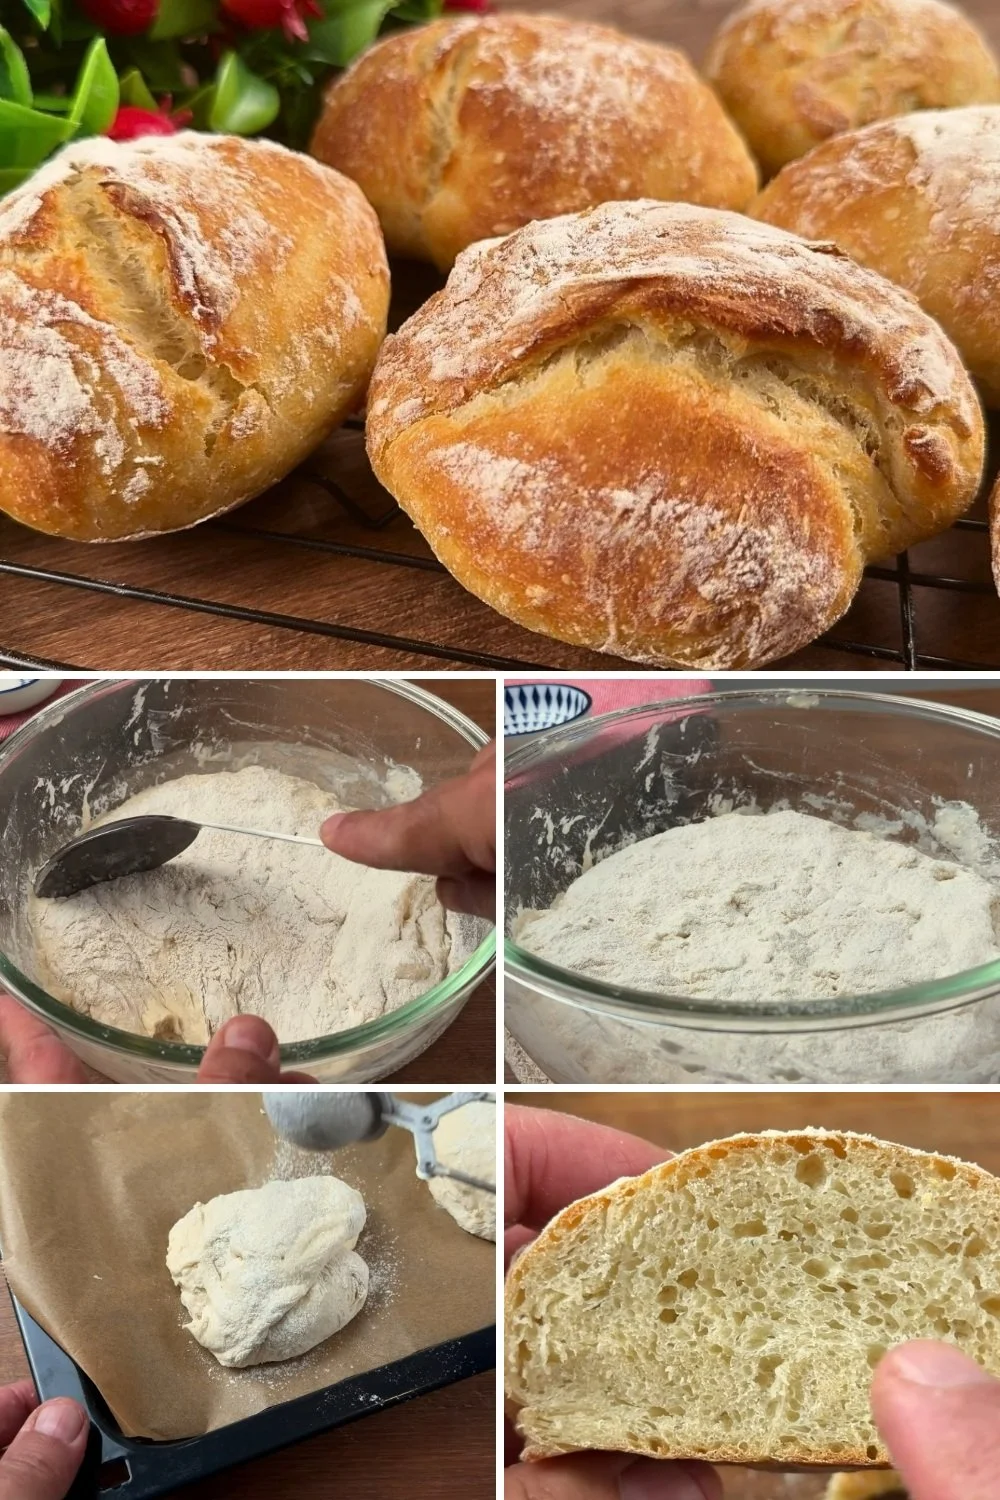
With the allure of a warm, crusty loaf of homemade bread, it’s hard to resist the idea of baking your own. This no-knead method is perfect for busy home cooks, requiring minimal hands-on time and yielding a delightful result that your family will love. No more store-bought bread! Imagine the scent of freshly baked bread wafting through your home—this recipe helps you create it with ease. The long rest time allows the flavors to develop beautifully, and the simplicity makes it a practical option for any day of the week.
Why You’ll Love This Recipe
- Minimal Effort: No kneading means less mess and more time for you.
- Fantastic Flavor: The long fermentation enhances the bread’s taste.
- Perfect Crust: Achieving that bakery-style crust at home is easier than you think.
- Flexible Timing: You can make the dough whenever it fits into your schedule and bake it when you’re ready.
- Beginner-Friendly: This recipe is approachable for anyone looking to dive into bread baking.
Ingredients
- 4 cups (480 g) all-purpose flour
- 1 ½ cups (365 ml) warm water
- 1 teaspoon (4 g) instant yeast
- 1 teaspoon (6 g) salt
- Additional flour for dusting hands
Step-by-Step Instructions
-
In a large bowl, combine the flour, warm water, instant yeast, and salt. Stir until everything is well mixed. The dough will be sticky—this is normal and part of the magic!
-
Cover the bowl with plastic wrap or a clean kitchen towel and let it rest at room temperature for 8 to 10 hours, or overnight. It should double in size and have a bubbly surface when ready.
-
In the morning, preheat your oven to 450°F (220°C) and place a Dutch oven or heavy pot with a lid inside to heat up.
-
Generously dust your hands and a clean work surface with flour. Scoop the dough out onto the floured surface, gently shaping it into a round loaf using your floured hands. Be careful not to deflate it too much.
-
Place the shaped dough on a piece of parchment paper and cover it with a towel. Let it rest for another 30 minutes while the pot heats.
-
Once preheated, carefully remove the pot from the oven (it will be very hot!). Lift the parchment paper with the dough and place it into the pot. Cover with the lid and bake for 30 minutes.
-
After 30 minutes, remove the lid and bake for an additional 15-20 minutes until the bread is golden brown and sounds hollow when tapped on the bottom.
-
Let the bread cool on a wire rack for at least 30 minutes before slicing. This helps to set the crumb for a better texture when you’re ready to enjoy it!
Pro Tips
- Use High-Quality Flour: A good all-purpose flour can make a difference in texture and flavor.
- Warm Water: Ensure your water is warm, not hot. You want it around 100°F (37°C) for the best yeast activation.
- Patience is Key: Don’t rush the resting times; that’s where the flavor develops!
- Baking Temperature Matters: Ensure your oven is fully preheated to get that nice crusty exterior.
Common Mistakes
- Underestimating Rest Time: Skipping or shortening the fermentation time can result in dense bread.
- Using Cold Ingredients: Cold flour or water can inhibit yeast activity.
- Not Dusting Enough: A sticky dough can be challenging to handle; ensure you coat your hands and work surface adequately with flour.
Variations
- Herb-Infused Bread: Add 1 tablespoon of dried herbs like rosemary or thyme to the mix for a flavorful twist.
- Cheese Loaf: Fold in shredded cheese during the mixing stage for a cheesy delight.
- Whole Wheat Bread: Substitute up to half the all-purpose flour with whole wheat flour for a heartier loaf.
- Seed Topping: Sprinkle sesame or poppy seeds on top of the dough before baking for added texture and flavor.
Serving Suggestions
This no-knead bread is wonderful served warm with butter, alongside soups, or used for sandwiches. It’s also perfect for a charcuterie board!
Storage Instructions
Store any leftover bread wrapped in plastic wrap or in a paper bag at room temperature for up to 3 days. For longer storage, slice and freeze it in an airtight bag.
Reheating Tips
To revive the crust, reheat leftover slices in a toaster or place them in a 350°F (175°C) oven for a few minutes. This brings back that delightful crispiness.
Nutrition Estimate
Approximately 180 calories, 6g protein, 34g carbs, and 1g fat per slice.
Recipe Summary
- Prep Time: 5 minutes (plus resting time)
- Cook Time: 45-50 minutes
- Total Time: 8-10 hours and 50 minutes (including resting)
- Servings: 10 slices
- Cuisine: Bread
- Course: Side
- Calories: 180 per slice
Frequently Asked Questions
-
Can I make this bread without a Dutch oven?
Yes, but you can expect a different crust texture. Consider using a baking stone or a regular baking sheet with water in a pan below to create steam. -
What if my dough doesn’t rise?
Make sure your yeast is fresh and your water is warm enough; temperature and yeast activity are crucial for rising. -
Can I add other ingredients?
Absolutely! Feel free to include ingredients like nuts, seeds, or dried fruits for added flavor. -
Why does the bread need to cool before slicing?
Cutting too early can result in a gummy texture; letting it cool helps it set beautifully.
This no-knead bread is not only an easy introduction to baking but also a comforting staple you’ll want to make time and again. Enjoy the rewarding experience of baking at home!
No-Knead Bread
This no-knead bread recipe yields a warm, crusty loaf with minimal effort, perfect for busy home cooks and anyone new to bread baking.