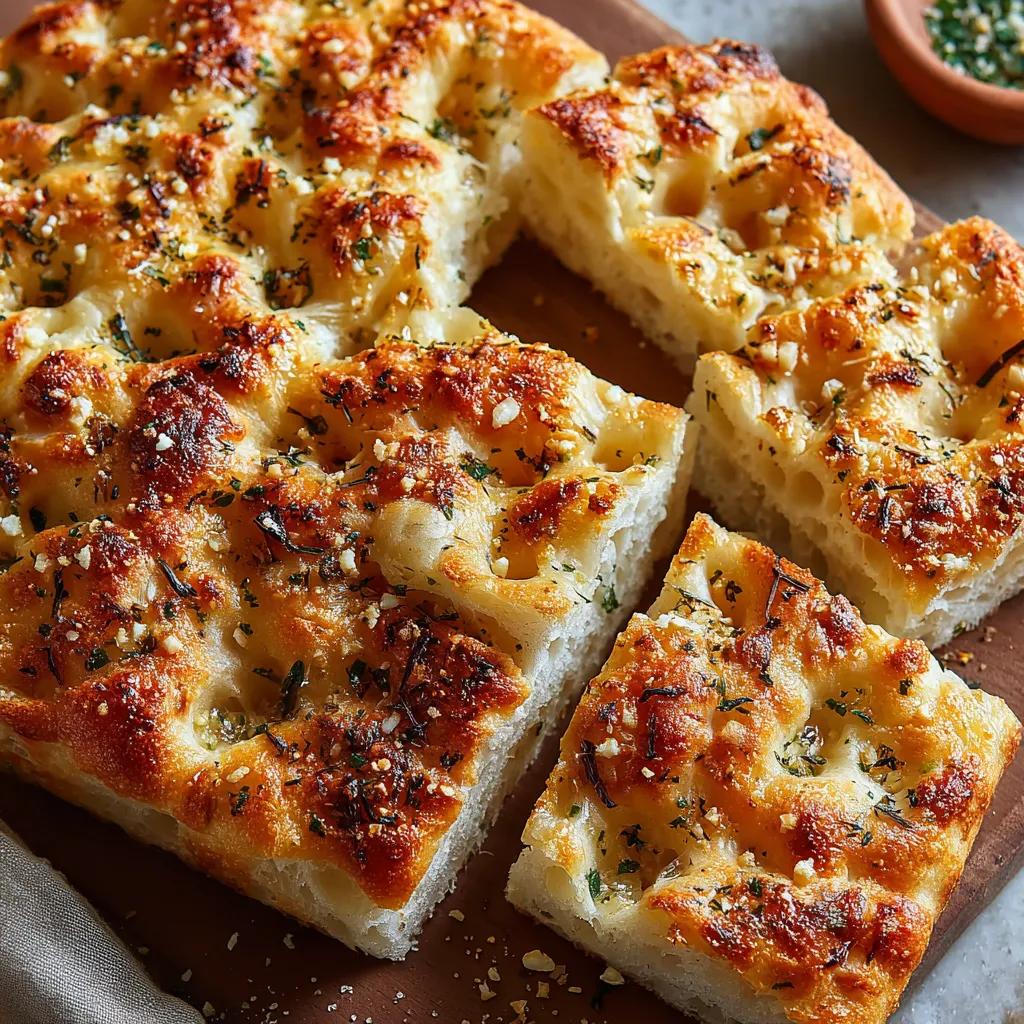
If you’ve ever wanted to make homemade focaccia bread but didn’t have access to an oven, this recipe might become one of your favorite ways to enjoy freshly baked-style bread at home.
This Pan-Fried Garlic Focaccia combines a beautifully golden exterior, a soft and airy center, and an incredibly flavorful roasted-style garlic butter topping.
And the most exciting part?
You can make it entirely on your stovetop.
No oven. No stand mixer. No complicated kneading techniques.
Just a simple yeast dough, a little patience, some good olive oil, and a frying pan with a lid.
The dough slowly develops flavor as it rises, while the olive oil helps create a crisp, golden crust during cooking.
Once the bread is ready, it’s generously brushed with a creamy mixture of gently cooked garlic, vegan butter, dairy-free Parmesan, and fresh parsley.
The result is a comforting homemade bread that’s perfect alongside pasta, soup, salads, or simply enjoyed warm on its own.
Whether you’re new to homemade bread or looking for a creative stovetop alternative to traditional focaccia, this recipe is a wonderful place to start.
Why You’ll Love This No-Oven Garlic Focaccia
1. No Oven Required
Traditional focaccia is usually baked in the oven.
This recipe uses covered frying pans instead, making it a useful alternative for small kitchens, warm weather, or situations where an oven isn’t available.
2. No Kneading Necessary
The dough comes together with a wooden spoon.
You don’t need to knead it for several minutes or use an electric mixer.
The relatively high moisture content and extended rising period help the dough develop structure.
3. A Beautiful Golden Crust
Olive oil plays an important role in this recipe.
It helps the focaccia develop a flavorful, golden crust while keeping the center tender.
4. Packed With Garlic Flavor
Instead of using raw garlic, this recipe gently cooks whole garlic cloves in olive oil until soft.
The garlic becomes mellow and easy to mash into a delicious spread.
Combined with parsley, vegan butter, and vegan Parmesan, it creates a rich topping.
5. Perfect for Sharing
The recipe produces two round focaccias.
Cut each round into four pieces to make eight servings.
Serve them on a wooden board or platter and let everyone enjoy a warm piece.
Recipe Overview
Recipe Name: Pan-Fried Garlic Focaccia with Garlic Butter
Course: Bread, Appetizer, Side Dish
Cuisine: Italian-inspired
Preparation Time: Approximately 20 minutes
Rising Time: 3–4 hours at room temperature, or 8–24 hours in the refrigerator
Garlic Preparation: Approximately 20–25 minutes
Stovetop Cooking: Approximately 11–15 minutes per round, plus any extra time needed to finish the center
Servings: 8 pieces
Yield: 2 round focaccias
Method: Stovetop frying pan
Diet: Vegan when prepared with vegan butter and dairy-free Parmesan
Difficulty: Easy to Moderate
Special Equipment: Two nonstick frying pans with lids, or one pan used in batches
Cooking and rising times are estimates. The thickness of the dough, pan size, heat level, and room temperature can affect the results.
Ingredients for Homemade Pan-Fried Garlic Focaccia
You only need a few basic bread ingredients and a flavorful garlic topping.
For the Soft Focaccia Dough
- 5 cups (625 g) all-purpose flour
- 2 cups (480 ml) lukewarm water
- 2¼ teaspoons active dry yeast (one standard 7 g packet)
- 2½ teaspoons salt
- 4 tablespoons extra virgin olive oil
For Cooking
- Extra virgin olive oil, enough to coat the bottoms of the frying pans generously
For the Garlic Butter Topping
- 8–10 garlic cloves, peeled
- 1 cup (240 ml) olive oil, for gently cooking the garlic
- ¼ cup (60 g) softened vegan butter
- ½ cup (50 g) finely grated vegan Parmesan
- 2–3 tablespoons finely chopped fresh parsley
- Salt, to taste
- Freshly ground black pepper, to taste
- Red pepper flakes, optional
Optional Finishing Ingredients
- Extra chopped parsley
- Additional vegan Parmesan
- A small drizzle of garlic-infused olive oil
- Flaky sea salt
Understanding the Ingredients
All-Purpose Flour
All-purpose flour gives the bread its structure while keeping the crumb tender.
Bread flour may also work, but it can produce a chewier texture and may absorb water differently.
The original recipe uses all-purpose flour, making it accessible for most home kitchens.
Active Dry Yeast
Yeast helps the dough rise and creates the air pockets that make focaccia soft and fluffy.
Make sure your yeast is fresh and within its expiration date.
If it doesn’t become foamy during activation, it may be inactive.
Lukewarm Water
Water hydrates the flour and helps activate the yeast.
Use water that feels comfortably warm rather than hot, ideally around 100–110°F (38–43°C).
Water that’s too hot can damage the yeast.
Extra Virgin Olive Oil
Olive oil adds flavor to the dough and helps form the focaccia’s golden exterior.
It is especially important during skillet cooking because the bread is in direct contact with the cooking surface.
Garlic
Gently cooked garlic develops a mellow, rich flavor.
Unlike raw garlic, which can taste sharp and intense, softened garlic blends smoothly into vegan butter.
Vegan Butter
Vegan butter creates a creamy, spreadable topping.
Choose a plant-based butter that softens easily at room temperature.
Vegan Parmesan
Vegan Parmesan adds a salty, savory flavor to the topping.
Different brands vary in texture and melting behavior, so choose one that you enjoy.
Fresh Parsley
Parsley brightens the garlic butter and adds freshness.
Finely chopping it distributes the flavor more evenly across the focaccia.
How to Make Pan-Fried Garlic Focaccia Step by Step
Follow these instructions carefully for the best texture and flavor.
Step 1: Activate the Yeast
Pour the lukewarm water into a large mixing bowl.
Sprinkle the active dry yeast over the water.
Stir gently to distribute it.
Let the mixture sit for approximately 5–10 minutes.
You should notice some bubbles or a light foam forming on the surface.
This indicates that the yeast is becoming active.
Helpful Tip: If your yeast doesn’t show activity, check its expiration date and the water temperature before proceeding.
Step 2: Combine the Dough Ingredients
Add the all-purpose flour and salt to the yeast mixture.
Using a wooden spoon or sturdy spatula, mix until no dry flour remains.
Pour in the four tablespoons of extra virgin olive oil.
Continue mixing until the oil is incorporated.
The dough will look soft, shaggy, and sticky.
This is normal.
You don’t want a firm, dry dough.
The higher moisture content is one of the reasons the finished focaccia develops a tender interior.
Step 3: Cover the Dough
Lightly coat a large bowl with olive oil.
Transfer the dough into the bowl.
Cover tightly with a lid, reusable cover, or plastic wrap.
Make sure the bowl has enough room for the dough to expand.
Step 4: Let the Dough Rise
You can choose between two rising methods.
Option A: Room-Temperature Rise
Leave the covered dough at room temperature for approximately 3–4 hours.
The dough should expand noticeably and develop bubbles.
The exact time depends on the temperature of your kitchen and the activity of your yeast.
Option B: Overnight Refrigerator Rise
Place the covered dough in the refrigerator for approximately 8–24 hours.
Cold fermentation can help develop a more complex flavor.
When you’re ready to cook, remove the dough from the refrigerator and let it sit until it’s relaxed enough to shape gently, usually around 30–60 minutes.
Important: Use the appearance of the dough as your guide rather than relying exclusively on the clock.
The dough should look expanded, airy, and bubbly.
Step 5: Prepare the Garlic
Place the peeled garlic cloves into a small saucepan.
Pour in enough olive oil to submerge them, using up to the listed cup.
Set the saucepan over very low heat.
The oil should remain gently warm with minimal bubbling.
Cook the garlic for approximately 20–25 minutes, or until the cloves become soft enough to mash with a fork.
Depending on the size of the cloves and your stove, they may need slightly more time.
Avoid letting the garlic turn dark brown or burn.
Safety Note: Never leave hot oil unattended. Garlic cooked in oil must not be stored at room temperature. Refrigerate any leftovers promptly and use within four days, or freeze for longer storage.
Step 6: Make the Roasted-Style Garlic Butter
Carefully remove the softened garlic cloves from the oil.
Transfer them to a small bowl.
Mash with a fork until they form a smooth paste.
Add the softened vegan butter, grated vegan Parmesan, chopped parsley, black pepper, and a small amount of salt.
Add red pepper flakes if you enjoy a little heat.
Mix everything until creamy and evenly combined.
If the mixture is too thick to spread, add a small spoonful of the garlic-infused olive oil.
Set aside until the bread is ready.
Because the garlic is gently cooked in oil rather than oven-roasted, this is technically a garlic confit-style butter rather than traditional roasted garlic butter.
Step 7: Divide the Risen Dough
Lightly oil your hands.
Gently loosen the risen dough from the bowl.
Transfer it onto a lightly oiled surface.
Divide it into two equal portions.
Handle the dough carefully to preserve some of the air bubbles.
Avoid kneading it again or pressing all the air out.
Shape each portion into a loose round.
Step 8: Prepare the Frying Pans
Choose two large, heavy-bottomed nonstick frying pans with well-fitting lids.
A pan around 10–12 inches wide generally provides enough room for a portion of dough to spread without becoming excessively thick.
Coat the bottom of each pan generously with olive oil.
Place one dough portion in each pan.
Using lightly oiled fingertips, gently stretch the dough toward the edges to create a round shape.
If the dough resists stretching, let it relax for 10–15 minutes before continuing.
Helpful Tip: Try to keep the dough relatively even in thickness so it cooks through properly.
Step 9: Cook the First Side
Place the covered frying pans over medium-low heat.
Cook for approximately 6–8 minutes.
The lower surface should begin turning golden, and the dough should start to firm up.
Keep the lids in place for most of the cooking time to trap heat.
This helps the thick bread cook more evenly.
Check the bottoms carefully to make sure they’re not burning.
If they brown too quickly, lower the heat.
Step 10: Flip the Focaccia
Once the underside is golden and firm enough to support turning, carefully flip the focaccia using a wide spatula.
For a large, delicate round, you can slide it onto a flat heatproof plate and carefully invert it back into the pan.
Add a little extra olive oil if necessary.
Cover again.
Cook the second side for approximately 5–7 minutes.
Continue cooking over low heat if necessary until the interior is fully cooked.
The bread should not have a raw, wet, or gummy center.
For additional certainty, check the center with an instant-read thermometer. An internal temperature of approximately 200–210°F (93–99°C) is a useful indicator that the bread is cooked through.
Important: Stovetop cooking can be less predictable than oven baking. If the bread is very thick, it may need substantially longer cooking at a lower temperature than the initial timing suggests.
Step 11: Add the Garlic Butter
When the focaccia is fully cooked, remove it from the heat.
Transfer the warm bread to a serving board.
Spread the prepared garlic butter mixture over the tops.
The warmth of the bread will help soften the butter and release the aroma of the garlic and herbs.
Sprinkle with additional fresh parsley and vegan Parmesan if desired.
Step 12: Slice and Serve
Allow the bread to rest briefly before cutting.
Slice each focaccia round into four portions.
Serve warm while the exterior is still golden and lightly crisp.
Enjoy on its own or pair with your favorite pasta, soup, salad, or dipping sauce.
The Secrets to Soft, Fluffy Skillet Focaccia
Making focaccia in a frying pan requires a slightly different approach than traditional oven baking.
These techniques can improve the result.
Keep the Dough Soft and Sticky
Avoid adding extra flour just because the dough feels sticky.
A well-hydrated dough helps create a tender crumb.
Use lightly oiled hands instead of adding large amounts of flour during shaping.
Let the Dough Rise Properly
Under-risen dough can result in dense bread.
Allow enough time for the dough to expand and develop visible bubbles.
Choose a Heavy-Bottomed Pan
A heavy pan distributes heat more evenly and reduces the risk of scorching.
Thin frying pans may create hot spots that burn the bread before its center cooks.
Use a Lid
Covering the pan traps some heat and moisture.
This helps the upper part of the dough cook while the bottom develops its golden crust.
Cook Slowly
Medium-low or low heat is essential, especially for thick focaccia.
A very hot skillet can brown the outside rapidly while leaving the interior undercooked.
Avoid Excessive Flipping
Allow the bread to develop enough structure before turning.
Flipping too early can cause the soft dough to tear.
Add the Garlic Butter After Cooking
The garlic butter contains ingredients that can scorch on direct heat.
Spreading it over the cooked bread preserves its flavor and helps prevent burning.
Delicious Garlic Focaccia Variations
This versatile bread can be customized with different herbs and toppings.
Rosemary and Sea Salt Focaccia
Add finely chopped fresh rosemary to the dough or sprinkle it over the bread while shaping.
Finish with a small amount of flaky sea salt.
Spicy Garlic Focaccia
Add extra red pepper flakes to the garlic butter.
A pinch of smoked paprika can also add depth.
Sun-Dried Tomato Focaccia
Add finely chopped, well-drained sun-dried tomatoes to the topping.
They provide a delicious tangy contrast to the rich garlic butter.
Vegan Cheesy Garlic Focaccia
Sprinkle additional vegan mozzarella-style cheese over the warm bread.
For a more melted topping, choose a cheese that softens easily with residual heat.
Garlic and Herb Focaccia
Combine parsley, chives, thyme, and a small amount of rosemary in the garlic butter.
This creates a fresh, aromatic variation.
Olive Focaccia
Add finely chopped, well-drained olives to the dough before shaping.
Keep the pieces small so they distribute evenly.
What to Serve With Pan-Fried Garlic Focaccia
Creamy Tomato Soup
Warm garlic focaccia is excellent for dipping into tomato soup.
The crisp crust contrasts nicely with the smooth soup.
Spaghetti With Tomato Sauce
Serve thick slices alongside spaghetti, marinara, or vegetable pasta.
Fresh Mediterranean Salad
Pair the bread with tomatoes, cucumbers, olives, and a lemon dressing.
Roasted Vegetables
Serve with roasted zucchini, carrots, bell peppers, or eggplant.
Hummus
Garlic focaccia makes a flavorful accompaniment to smooth homemade hummus.
Olive Oil and Balsamic Dip
For a simple appetizer, serve the bread with a little extra virgin olive oil and balsamic vinegar.
Make-Ahead Instructions
One of the advantages of this recipe is that you can prepare the dough in advance.
Overnight Dough
Prepare the dough the evening before.
Cover it tightly and refrigerate.
The next day, allow it to relax before shaping and cooking.
Make the Garlic Topping Ahead
You can prepare the garlic topping in advance and refrigerate it promptly in a covered container.
Bring the portion you intend to use to a spreadable consistency before serving.
Because this topping contains garlic cooked in oil, keep it refrigerated and use within four days.
Cook Before Serving
For the best flavor and texture, cook the focaccia relatively close to serving time.
The crust is most enjoyable when the bread is freshly made.
How to Store Leftover Garlic Focaccia
Room-Temperature Storage
Plain cooked focaccia without the garlic-butter topping can be stored in a sealed container at room temperature for a short period, preferably no longer than one day for best quality.
Refrigerated Storage
Because the finished recipe contains a garlic-in-oil preparation, refrigerate leftover topped focaccia promptly.
Store in an airtight container and use within four days.
Freezer Storage
For longer storage, freeze the cooked focaccia without the topping when possible.
Wrap the bread tightly and place it in a freezer-safe bag.
Use within approximately two months for best quality.
Reheating
Reheat plain focaccia in a covered skillet over low heat until warmed through.
If it has already been topped with garlic butter, reheat gently to avoid burning the garlic or herbs.
For the best texture, freshly cooked bread is ideal.
Common Mistakes to Avoid
Mistake 1: Adding Too Much Flour
The dough is supposed to be soft and sticky.
Adding too much flour can result in dense focaccia.
Solution: Measure flour accurately and use lightly oiled hands for shaping.
Mistake 2: Skipping the Rising Time
Insufficient fermentation can leave the bread heavy.
Solution: Wait until the dough has expanded and developed bubbles.
Mistake 3: Using a Very Hot Pan
High heat may burn the exterior before the inside cooks.
Solution: Cook over medium-low to low heat.
Mistake 4: Making the Bread Too Thick
An excessively thick focaccia can be difficult to cook evenly on a stovetop.
Solution: Use large enough frying pans and spread the dough evenly.
Mistake 5: Burning the Garlic
Garlic becomes bitter when overcooked.
Solution: Cook the cloves gently over very low heat, without aggressive frying.
Mistake 6: Adding the Topping Too Early
The vegan butter and garlic may scorch if they sit directly against a hot cooking surface.
Solution: Add the garlic butter after the bread is cooked.
Frequently Asked Questions
Can You Really Make Focaccia Without an Oven?
Yes.
Covered frying pans can cook focaccia-style dough directly on the stovetop.
However, cooking thick bread in a skillet requires careful heat control and may take longer than conventional oven baking.
Do I Need to Knead the Dough?
No.
This recipe uses a no-knead method.
Mixing the ingredients thoroughly and allowing sufficient rising time helps develop the dough.
Can I Make Focaccia Without a Stand Mixer?
Absolutely.
A wooden spoon or sturdy spatula is enough to combine the ingredients.
Why Is My Focaccia Dense?
Possible causes include inactive yeast, insufficient rising time, excessive added flour, or pressing too much air out during shaping.
Why Is My Bread Raw in the Middle?
The focaccia may be too thick, or the pan may be too hot.
Reduce the heat, keep the pan covered, and extend the cooking time as needed.
Can I Use Bread Flour?
Yes, although bread flour may absorb water differently and create a chewier texture.
Can I Use Instant Yeast?
Yes.
Instant yeast can generally be mixed directly with the flour.
Follow the manufacturer’s instructions and monitor dough expansion rather than relying exclusively on rising time.
Can I Use Regular Butter and Parmesan?
Yes, if you’re not following a vegan diet.
However, the finished recipe will no longer be vegan.
Can I Cook the Focaccia in One Pan?
Yes.
Cook the dough in two batches.
Keep the second portion covered while the first round cooks.
What Makes Focaccia Different From Regular Flatbread?
Focaccia generally uses a yeast-leavened, olive-oil-rich dough and has a tender, airy crumb.
Flatbreads vary widely and may be leavened or unleavened.
This skillet version borrows focaccia’s soft yeast dough and olive oil crust while replacing oven baking with covered pan cooking.
Printable Recipe Card
Easy Pan-Fried Garlic Focaccia
Prep Time: 20 minutes
Rising Time: 3–4 hours or overnight
Cooking Method: Stovetop
Servings: 8 pieces
Yield: 2 round focaccias
Ingredients
Dough
- 625 g all-purpose flour
- 480 ml lukewarm water
- 2¼ teaspoons active dry yeast
- 2½ teaspoons salt
- 4 tablespoons extra virgin olive oil
For the Pans
- Extra virgin olive oil
Garlic Butter
- 8–10 garlic cloves
- Up to 240 ml olive oil for gently cooking garlic
- 60 g vegan butter
- 50 g grated vegan Parmesan
- 2–3 tablespoons fresh parsley
- Salt and black pepper
- Optional red pepper flakes
Instructions
- Combine lukewarm water and active dry yeast. Let stand for 5–10 minutes.
- Add flour and salt. Mix until no dry flour remains.
- Add four tablespoons olive oil and combine into a sticky dough.
- Cover and allow to rise for 3–4 hours at room temperature or 8–24 hours in the refrigerator.
- Gently cook peeled garlic cloves in olive oil over very low heat for approximately 20–25 minutes.
- Mash the softened garlic and combine with vegan butter, vegan Parmesan, chopped parsley, and seasonings.
- Divide the risen dough into two equal portions.
- Place each portion into a generously oiled frying pan.
- Gently stretch the dough into an even round.
- Cover and cook over medium-low heat for approximately 6–8 minutes.
- Carefully flip and cook for another 5–7 minutes.
- Continue cooking on low heat as needed until the centers are completely cooked.
- Remove from the heat and spread the garlic butter over the warm focaccia.
- Sprinkle with extra parsley, slice into eight pieces, and serve.
Important Note: The stated cooking times are starting estimates. Always verify that the center is fully cooked, especially when using a smaller pan that produces a thicker round.
Final Thoughts
Homemade bread doesn’t have to be complicated, and you don’t always need an oven to enjoy something warm and delicious.
This Easy Pan-Fried Garlic Focaccia brings together the comforting flavors of homemade bread, olive oil, soft garlic, and fresh herbs in a simple stovetop recipe.
The golden crust and tender center make it delicious on its own, while the rich garlic butter adds an irresistible savory finish.
Serve it alongside pasta, soup, or a fresh salad, or slice it into pieces for a flavorful appetizer.
If you enjoy making easy homemade bread, this no-oven focaccia is a fun recipe to add to your collection.
Would you serve this garlic focaccia with pasta, soup, or simply enjoy it warm with extra garlic butter?
Save the recipe for your next homemade bread day and share your favorite way to enjoy focaccia!
Recipe Keywords: Pan-Fried Garlic Focaccia, No Oven Focaccia, No Knead Bread, Skillet Focaccia, Vegan Garlic Bread, Homemade Focaccia, Garlic Butter Bread.